Best Backpacks for Shoulder Pain: Suspensions Tested
By Linnea Sørensen • 2nd May
Shoulder discomfort while hiking or carrying a pack doesn't mean your body isn't suited for the trail, it means your pack hasn't been matched to your geometry yet. Backpacks for shoulder pain require thoughtful suspension design, and understanding how different systems route load can transform your experience. Whether you're managing a rotator cuff injury, sensitive trapezius muscles, or simply bearing weight that your current pack distributes poorly, the right shoulder-friendly backpack comparison moves you from guessing to knowing what works for your frame.
Understanding Shoulder Load and Suspension Systems
How Much Should Your Shoulders Carry?
One of the most liberating insights I've shared at community fit events is this: your shoulders shouldn't carry all the weight. A well-tuned pack shifts load to your hips (the strongest part of your torso). Experts recommend keeping overall load between 10-15% of your body weight, but the distribution matters far more than the total.[2] For practical packing tips that minimize shoulder strain, see our weight distribution guide. If you weigh 160 pounds, a 30-pound pack is reasonable in theory, yet improper suspension can concentrate pressure on your shoulders, neck, and traps, turning a manageable load into misery.
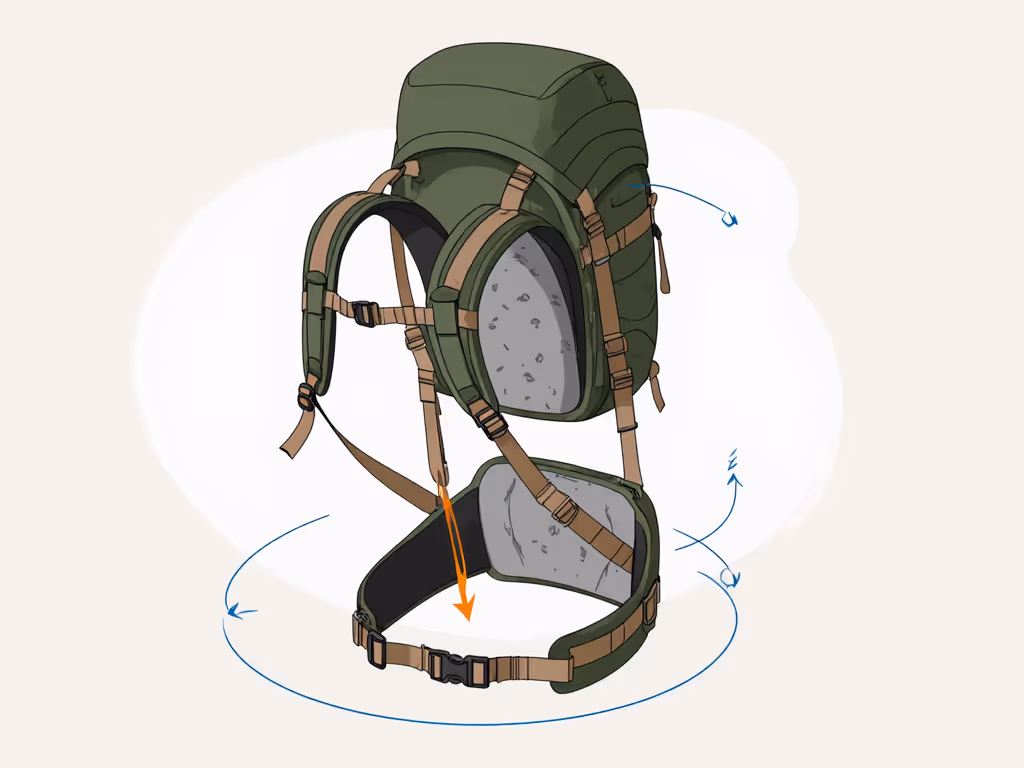
The hip belt is the load path's anchor. When it sits snugly on the bony ridge of your pelvis (not your soft belly) it carries 60-75% of the pack's weight. Your shoulders then stabilize and balance, not strain. This is where many suffer needlessly: they've never truly listened to the belt.
Framed vs. Frameless for Shoulder Relief
For hiking with rotator cuff injury or chronic shoulder sensitivity, the frame type is not decorative, it is structural medicine. A framed backpack (internal or external frame) distributes weight to the hip belt more efficiently than a frameless pack.[3] Learn the pros and cons in our internal vs external frame guide. Frameless packs work for ultralight loads under 10 pounds of base gear, but once you're carrying 25-35 pounds, load shifts upward and forward, placing more burden on shoulders and straps.[3]
An external frame is particularly useful if you cannot carry weight forward on your shoulders at all. A beefy hip belt attached to an external frame can carry virtually all pack weight on your hips, with shoulder straps reduced to simple stabilizers.[3] For those managing injury or chronic pain, this can feel like permission. Fit that respects your body feels like permission.
Strap Placement and Torso Length
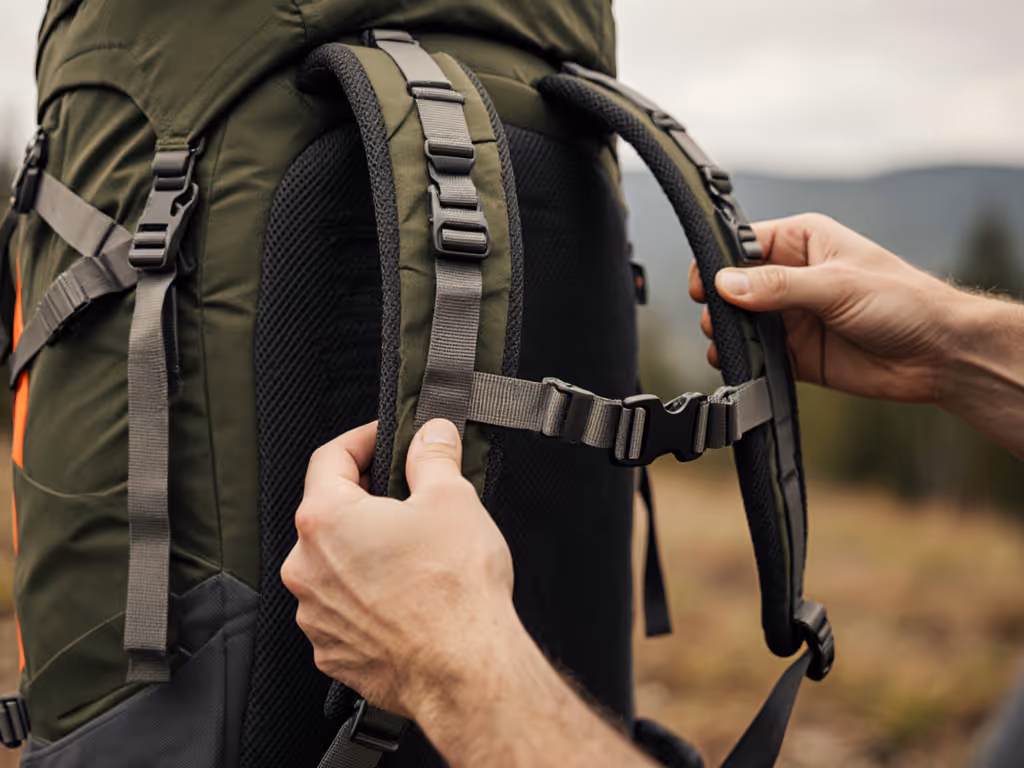
Where your shoulder straps attach to the pack's main body fundamentally changes how load transfers. A pack designed so straps attach 1-2 inches above your natural shoulder point routes load downward and inward toward your hip belt.[3] Many off-the-shelf packs attach straps too low, which tugs your shoulders backward and forces your traps and upper back to compensate, which is a recipe for pain.
Torso length is the hidden variable here. Use our step-by-step torso measurement guide to get this right. A pack with a 15-inch torso molded to your spine transfers load smoothly if your actual torso is 15-16 inches. If you have a 17-inch torso in a 15-inch pack, the hip belt hangs low and misaligns; straps pull wrong angles. The pack design itself becomes the problem, no matter how much you adjust.
FAQ: Common Shoulder Pain and Pack Fit Questions
Q: What backpack shoulder strap design actually reduces nerve pinch and numbness?
A: Padding alone doesn't solve the problem: geometry does. Wide, padded shoulder straps reduce pressure concentration, but only if they're anchored at the right height and angle for your shoulders.[1][2] Look for straps that:
- Sit naturally on the slope of your shoulder without sliding inward toward your neck
- Have a subtle curve or ergonomic shape that follows your shoulder anatomy, not a straight strap
- Attach to the pack high enough that they don't pull downward on your collarbone
Beyond padding, the most effective reduced shoulder strain packs pair narrow, angled load lifters (the small straps that run from pack to shoulders) with straps that can be adjusted forward or back. When load lifters angle toward your body at roughly 45 degrees, they help guide weight down to your hips rather than hanging on your shoulders.[2]
I've seen hikers with identical shoulder width carry the same weight in near-identical packs, yet one experiences nerve pinch and the other doesn't. The difference? The comfortable pack had load lifters adjusted to pull weight down and back, while the painful one had load lifters that angled too far forward, creating a hook effect. Small angle, huge difference.
Q: Are there pack options for those who cannot bear shoulder weight at all?
A: Yes, a lumbar pack or hip-belt-focused pack is a legitimate solution for those with shoulder injury or chronic conditions. A lumbar pack is essentially a large hip belt with a small pack or pouch attached; it carries load almost entirely on your waist and requires minimal shoulder contact.[3] These are ideal for short day hikes or ultralight overnights where base weight stays under 8-10 pounds.
For longer trips or heavier loads, an external frame pack with a robust hip belt and minimal strap tension mimics this principle at larger scale.[3] The Luxurylite External Frame UL Pack, for instance, is engineered so the frame hooks directly to a deep hip belt; load routes through your pelvis, and shoulder straps become purely stabilizers.[3]
These aren't compromise solutions, they're design solutions for bodies that need them. For model recommendations evaluated with real users, see our backpacks for chronic pain guide. Some hikers find them more comfortable than traditional suspended packs, even without injury, because the load path is clearer and the hip carry more intuitive.
Q: What if your shoulder pain is only on one side?
A: Asymmetrical shoulder pain often signals that the pack is riding off-center, either because the load inside is unevenly distributed or because one strap is adjusted tighter than the other. Before assuming you need a specialized pack, try these steps:
- Load heavier items closest to your back at the level of your hip belt; this keeps the pack's center of gravity aligned with your spine.[2]
- Check strap tension equality: stand in front of a mirror and compare the tightness and angle of both shoulder straps. One should not be noticeably tighter or pulling at a different angle.
- Adjust the hip belt so it sits level on your pelvis (not tilted, riding higher on one side, or twisted).
- Examine load lifter angles: they should pull symmetrically, not favoring one shoulder.
Often, fixing these mechanics resolves one-sided pain without pack replacement. I watched this happen at a community fit event: a hiker who thought backpacking wasn't for their body simply had straps and load lifters misaligned. Once we rotated the belt, re-routed the lifters, and tuned the torso fit, their posture visibly relaxed before we even discussed new gear. That's what fit feels like when it works: ease, not accommodation.
Evaluating Suspension Systems for Shoulder Pain
Key Features to Assess
When comparing packs for shoulder-sensitive carry, look for these suspension systems for shoulder pain characteristics:
- Ventilated back panel: reduces sweat and friction, which compound shoulder pressure on longer carries.[1]
- Adjustable, high-mounting straps: allows you to fine-tune attachment height to match your shoulder anatomy, not a one-size average.
- Prominent, easy-to-reach load lifters: you should be able to adjust them on the trail without removing the pack.
- Removable or modular hip belt: lets you experiment with belt size and stiffness without buying a new pack.
- Frame stiffness rating: heavier loads require stiffer frames to prevent saggy load paths that dump weight onto shoulders. A flexible frame under a 30-pound load doesn't inspire confidence.
Real-World Load Testing
None of these features matter if you haven't tested them at your expected trip weight. Backpack comfort at 15 pounds feels entirely different at 28 pounds, and genuinely good packs maintain that comfort across the range. When evaluating, ask whether the manufacturer publishes a recommended load range and whether field testers have validated comfort at your specific weight.
The brands highlighted in fit-focused research, such as SwissGear 1900 with its padded straps and airflow back padding, Incase Icon with ventilated panels and ergonomic routing, and Timbuk2 Authority Pack with padded suspension and organizational logic[1], share a common thread: they were designed to keep load off shoulders through intentional hip-belt integration and strap geometry, not just cushioning.
Your Next Steps
Start With Measurement, Not Guess
- Measure your torso: Standing, find the base of your neck (vertebra prominence) and the top of your hip bone. The distance between them is your torso length. Write it down.
- Measure your hips: At the bony ridge (not soft waist), measure the circumference. Use this to select belt size.
- Note your shoulder width: Inside edge to inside edge of your shoulders. This informs strap geometry.
Visit a Fit Professional or Retailer
Many outdoor retailers and community organizations offer pack fitting clinics (some free, some low-cost). Bring your measurements and your expected trip weight (or simulate it with sandbags). Ask the fitter to adjust torso length, belt position, and load lifter angle while you stand and lean. Pain or pressure should disappear, not shift to another spot.
Test Before Committing
Use the retailer's return policy or rental program. Carry your chosen pack on a day hike or overnight at your expected load. Walk downhill, scramble, and navigate terrain similar to your planned trips. If shoulder pain emerges after an hour or returns after a week, return it.
Fine-Tune on Your Next Trip
Once you have the right pack, expect a 3-5 trip adjustment period as you dial in strap angles, load-lifter tension, and load distribution. Each trip, small tweaks compound into intuitive comfort. The goal is for the pack to disappear, to feel less like gear and more like an extension of your body.
--
Shoulder pain while backpacking is not a sign that hiking isn't for you. It's a signal that your pack's suspension system hasn't been aligned to your frame. By understanding how hip belts carry load, how strap geometry matters, and what torso length truly means, you can move from guessing at comfort to knowing it. The right pack is a tool of self-respect on the trail, one that lets you focus on the hike, not the hurt.
Related Articles